
How to Freeze Your Breast Milk: Conserving Space (AKA: The Brick Storage Method) By Natasha Dodge
A breast milk brick? What the heck?
Introduction
This week we’ll take some talk about milk storage! There are many ways to store your milk. We’re sure you’ve seen and heard of all of the various ways to store milk, but our hope is to share a method that we’ve found to be very effective for both short and long term storage. Natasha Dodge, staff member and up and coming Breastfeeding Specialist at The Breastfeeding Center, breaks down the “Brick Storage Method”.
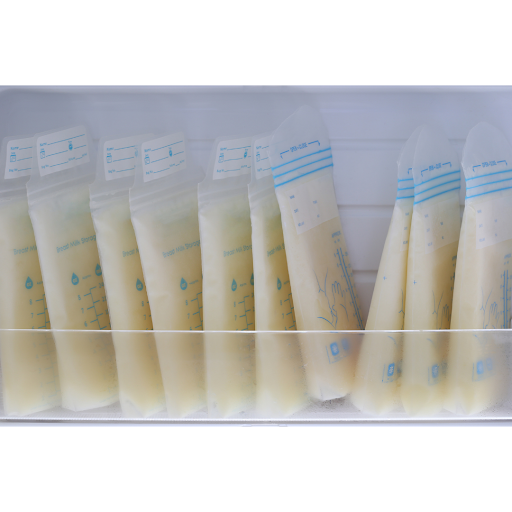
Although it sounds strange, “breast milk bricks” can be an efficient and space-saving way to store milk. While glass and BPA-free plastic bottles are convenient, they can take up a lot of room in a freezer or fridge. Brick storage on the other hand is a great space-saving way to store breast milk in a freezer. For parents that are planning to build a “breast milk stash” for returning to work, for example, brick storage can be a great way to organize your milk as well as help keep track of how much milk is in your “stash.” For breast milk donors, we also recommend brick storage as breast milk bags that are stored this way are easier to keep organized in the freezer and can save up a lot of space during packing.
Continue reading for more information regarding efficient storage as well as ways to avoid cross contamination when using the Brick Storage Method.
Supplies to consider for brick storage
Breast milk storage bags
A flat surface to place in the freezer (i.e. a cookie sheet)
A permanent marker
A deep freezer/chest freezer (helpful if you want to keep frozen milk for longer than 6 months)
A freezer lock (so helpful if you have toddlers or a chest freezer that is easy to open)
Step 1: Breastmilk Storage Guidelines Check
Before you store your milk, make sure that the bag/bottle can be stored. Follow these guidelines:
| Conditions | Storage Duration |
|---|---|
| Room temperature (60-85°F / 16-29°C) | Up to 6 hours |
| Insulated Cooler with Ice Pack (59°F / 15° C) | 24 hours |
| Refrigerator (< 39°F / 4° C) | Up to 7 days (best if under 4 days) |
| Freezer (0°F / -17° C) | Up to 6 months |
| Deep Freezer (-10°F +) | Up to 12 months |
*These guidelines are for healthy term babies. Please refer to your lactation consultant or Pediatrician for information on storage guidelines for preterm babies, babies in the NICU, and babies with health concerns.
Quick Note: If you are storing in bags, use Breast Milk Storage Bags that are made specifically for collecting and/or storing breast milk. It is important to use breast milk-specific bags because other storage bags like Ziplocs are not sterile. Many breast pump brands or bottle brands make a version of a breast milk storage bag.
Some storage bags that we recommend include: Lansinoh Milk Storage Bags, Medela Breast Milk Storage Bags, Ameda Store N' Pour Bags.
Step 2: Filling the Breast Milk Storage Bags
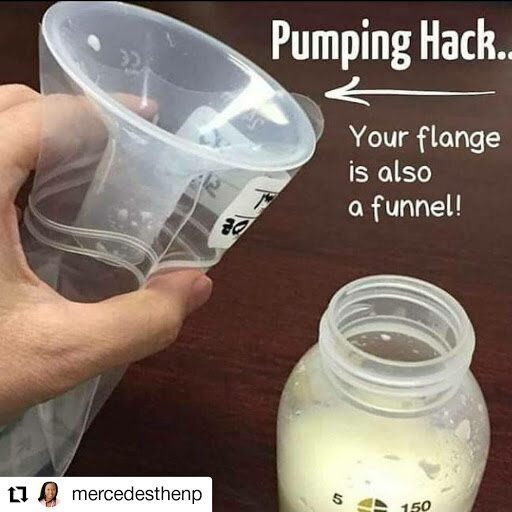
Whether you pump into the breast milk storage bag or transfer the milk from a bottle into a bag, it is important that you do not fill the bag all the way to the top. Leave a little space at the top (max 1 inch) to ensure that when the milk freezes, it does not expand in the bag and open it, which does compromise the bag.
If you are transferring milk from a bottle into a bag, check out this handy trick!
Once you have added the milk into the bag, you can also try to remove the air to increase storage capacity as well as help preserve the milk in the bag.
Here is a helpful video tutorial to do this.
And here is another!
Step 3: Label the Bag
Before you place the breast milk bag in the freezer, some things you might want to consider writing: label the bag with the date of expression, the amount of ounces, and the use by date. You can also include your child’s name here if you are bringing breast milk to a daycare, have more than one little one, etc. You can also write any other helpful notes like “first pumping session” or “baby has a cold.” Encouraging notes to self can be helpful too, like: “you got this, mama!” “Hard day, but I got through it!!”
*If you are a milk donor, please be sure to follow any additional guidelines provided by the Milk Bank.
Step 4: Store Your Milk
Now that your milk is ready to be stored, you can place your milk in the freezer. We recommend storing you milk near the middle or back of the freezer instead of closer to the door where the temperature can fluctuate more. Also, freeze your breast milk bag flat in the freezer. Once frozen, you can reorganize and rearrange. Cookie or baking sheets or Tupperware containers can be helpful flat surfaces for freezers.
Step 5: Long-term storage
Once your milk has frozen in the freezer, you can group together frozen bags in a large gallon-sized Ziplock bag (which fits ~10-15 bricks depending on the size) or in boxes/plastic storage bins. Once you have filled a Ziploc bag/box, label it with a range of dates for the individual bags as well as how many ounces approximately are grouped together. Alternating the bags upside down, which will help them fit together and take up less space.
You can also mix together the amount of ounces in each Ziploc bag/box. Sometimes it can be helpful to include smaller ounces and larger ounces in the same Ziploc/box so that you don’t have to use more milk than you need.
Step 6: Keeping Track of your Frozen Milk
On top of labeling the bags, you may also want to keep a log for how much breast milk is stored altogether. To do this you can:
use a pumping app like Milk Maid or Pump Log
tape a spreadsheet to the freezer
add a small white board to the kitchen
use another creative solution that works for you and your family!
Questions or concerns about milk storage guidelines? We’re here to help! Join us for:
Or book a one-on-one appointment with a Lactation Consultant here: breastfeedingcenter.org/appointments
Interested in becoming a milk donor? Learn more here!