
How to Medela Symphony: a reference guide for part assembly, quick start, and troubleshooting
You are interested in boosting your milk supply and your lactation consultant recommended the Medela Symphony and now have questions. Well, we have answers. Below you’ll find helpful suggestions and tips as you get started using the Medela Symphony. If you’ve stumbled upon this blog and want to rent a symphony with us, you can do so here.
What do you need to get started?
Prior to arriving home, please make sure you have the intended parts that go along with your Medela Symphony. A common misconception we see with our clients is that they assume that parts are provided with the multi-user breast pump, however, that is not the case. Breast pump parts are considered personal use only and certain parts, such as the flange’s sizing, can be particular to the lactating person. Therefore, those parts are sold separately! Here at The Breastfeeding Center, we sell Medela Symphony part kits along with the individual parts.
Medela Symphony parts needed for double pumping:
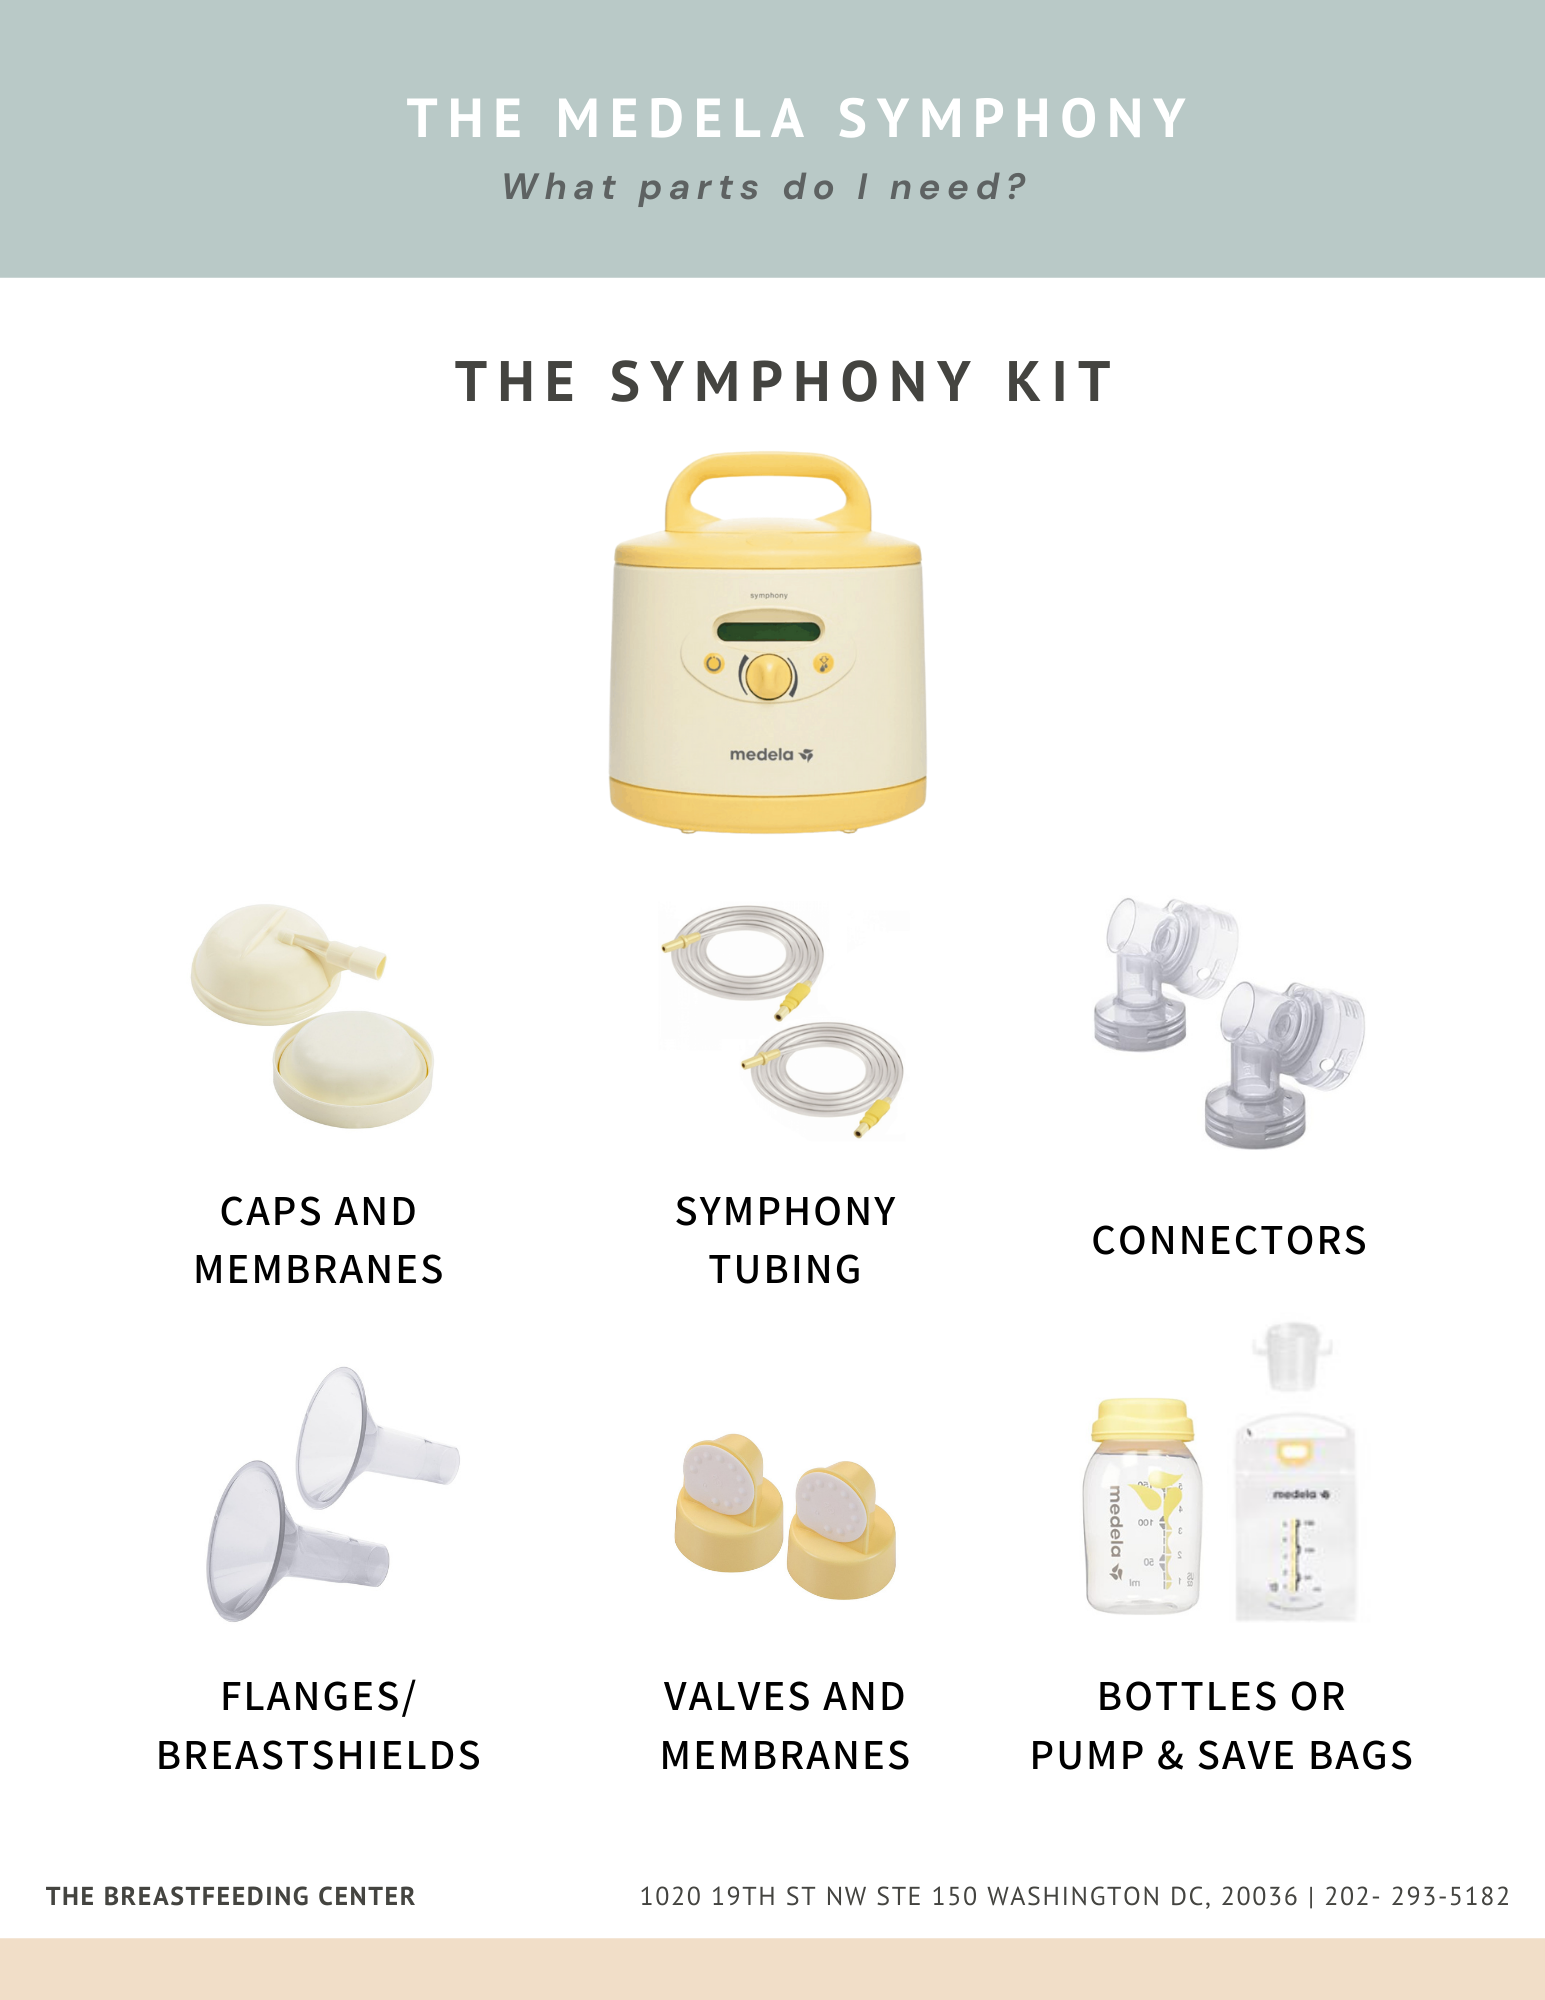
2 PersonalFit Flanges
2 PersonalFit Connector
2 Tubes
2 Membranes
2 Membrane Caps
2 Protective Membranes
2 Bottles
Should I buy extra parts? When do I need to replace my Medela Symphony parts?
We do recommend purchasing extra parts, especially your valves and membranes as they should typically be replaced every 6-8 weeks if you are a frequent pump user. We also recommend purchasing a few extra bottles and storage bags for packaging and storing your freshly pumped milk, and also to limit the amount of cleaning you’ll be during before and after each session.
Please also ensure you have the correct flanges. A flange is the funnel part of a pump that makes contact with the breast. Having the proper flange tube size can greatly impact how your pumping experience may ensue. Ensuring you have the correct fit is very important. Medela Kits typically only come with 24mm flanges. Medela PersonalFit flanges range from 21mm - 36mm. Consult your lactation consult for a fitting or reference our flange fitting guide here.
How to clean and sanitize your pump parts?
You’ll need to disassemble your parts prior to first use and clean them thoroughly. Here are some quick tips as you clean:
Always wash your parts after expressing milk, any equipment that has directly touched your breast, or milk including bottles, valves, and flanges.
Rinse off your pump equipment with water suitable for drinking.
Wash them with warm water and mild dish liquid, take a clean cloth and clean your parts
Rinse the parts again 15-20 seconds
Dry the parts with a clean washcloth or let them airy dry on a clean cloth
Alternatively, you can wash your pump parts in your dishwasher on the top rack,
#tip: tubing does not need to be washed each time. Tubing only needs to be cleaned if milk is found inside the tube, or if the tubing has gotten soiled.
Remove tubing, immerse in rubbing alcohol, wipe, and hang to dry. Avoid introducing water to tubing for cleaning, as this adds moisture which can lead to mold.
If you notice condensation in your tubing after pumping, you may try disconnecting your flanges and other parts, leave the tubing attached to the pump, and let it run on another full pumping cycle to help evaporate the moisture.
Replace any tubing that is moldy and stop use immediately
Sanitizing your equipment
Medela recommends sanitizing your pump parts at least once per day after washing them.
Sanitizing is to ensure the removal of bacteria and germs and ensure the safety of use for you and your little one. So, how’s it done?
Boil: place parts in a pan and cover with water. Once they begin to boil, let them continue for at least 5 minutes. (note: while this method is fine if it’s your only option, it’s also VERY prone to warp plastic parts as it involves the highest heat for the longest time)
Microwave Steam: put parts in a sanitizing bag and follow instructions given for item. This is the method we use at The Center, and the one we recommend most. It’s fast, effective, and least likely to warp pump parts.
Dishwasher Sterilize Cycle: place your pump parts in your dishwasher on a sterilize cycle. You know your dishwasher best—some get VERY hot, too hot for precision-plastic parts.. If that’s the case, you might rule out this method.
Sterilizing Spray: this is a great option for those pumping away from home or from other methods of cleaning and sterilizing.
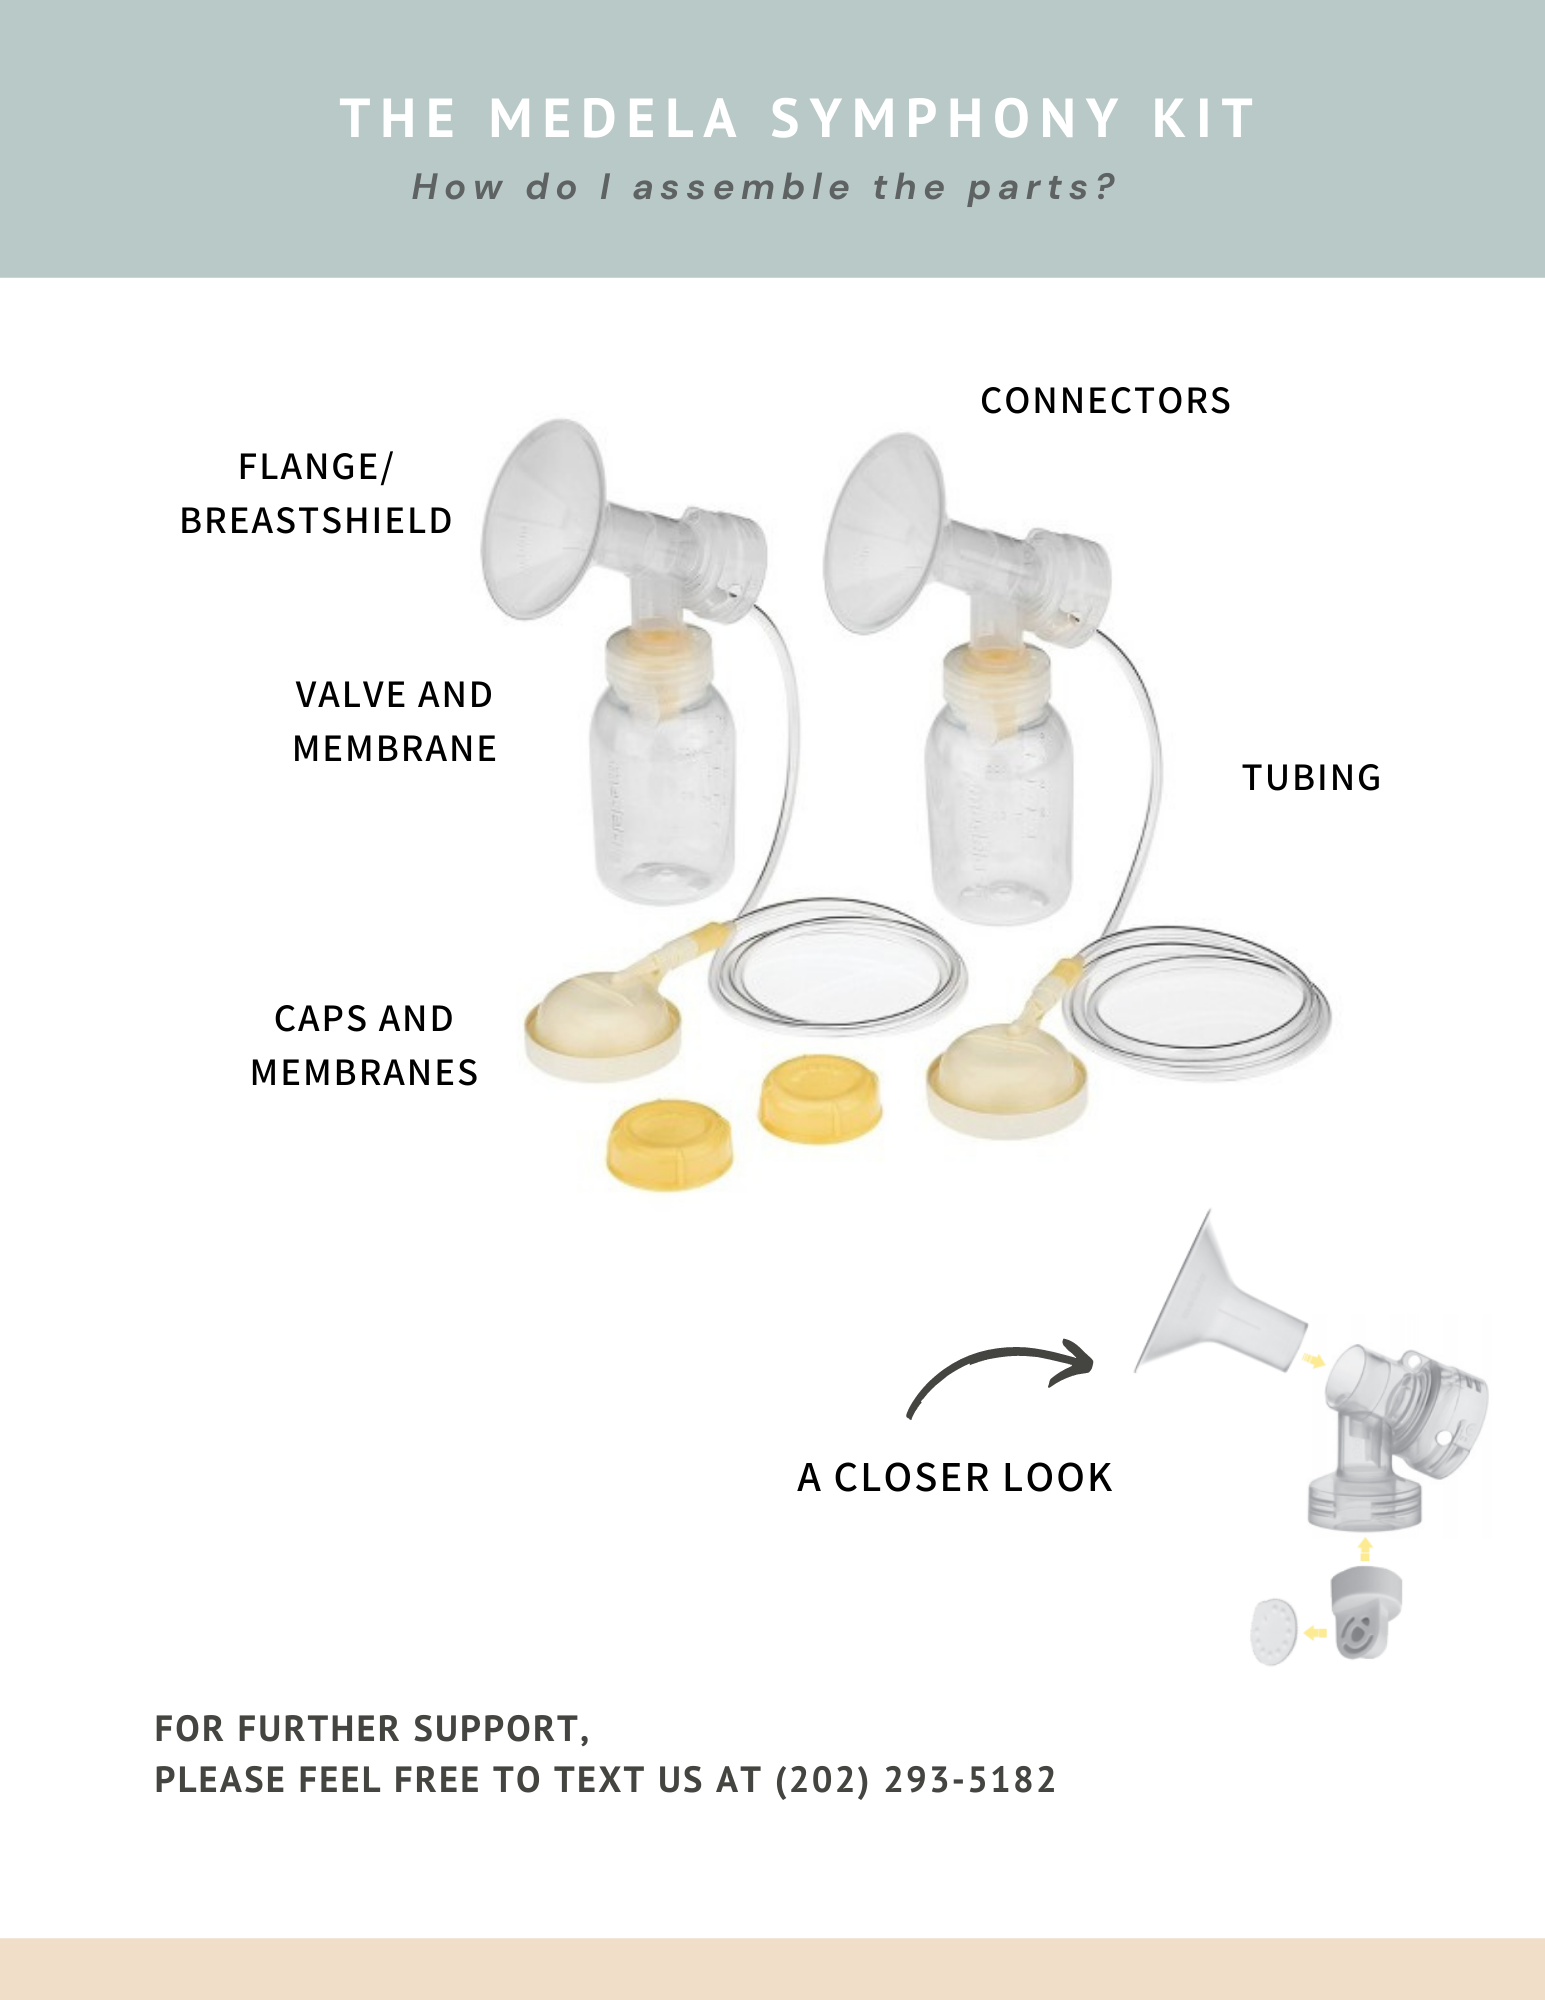
Let’s AssembleHere at The Center, we love a good visual. Watch the video below of our staff member, Natasha assembling the Medela Symphony with its parts, and check out the photos below.
We’re assembled, now how do I work this thing?
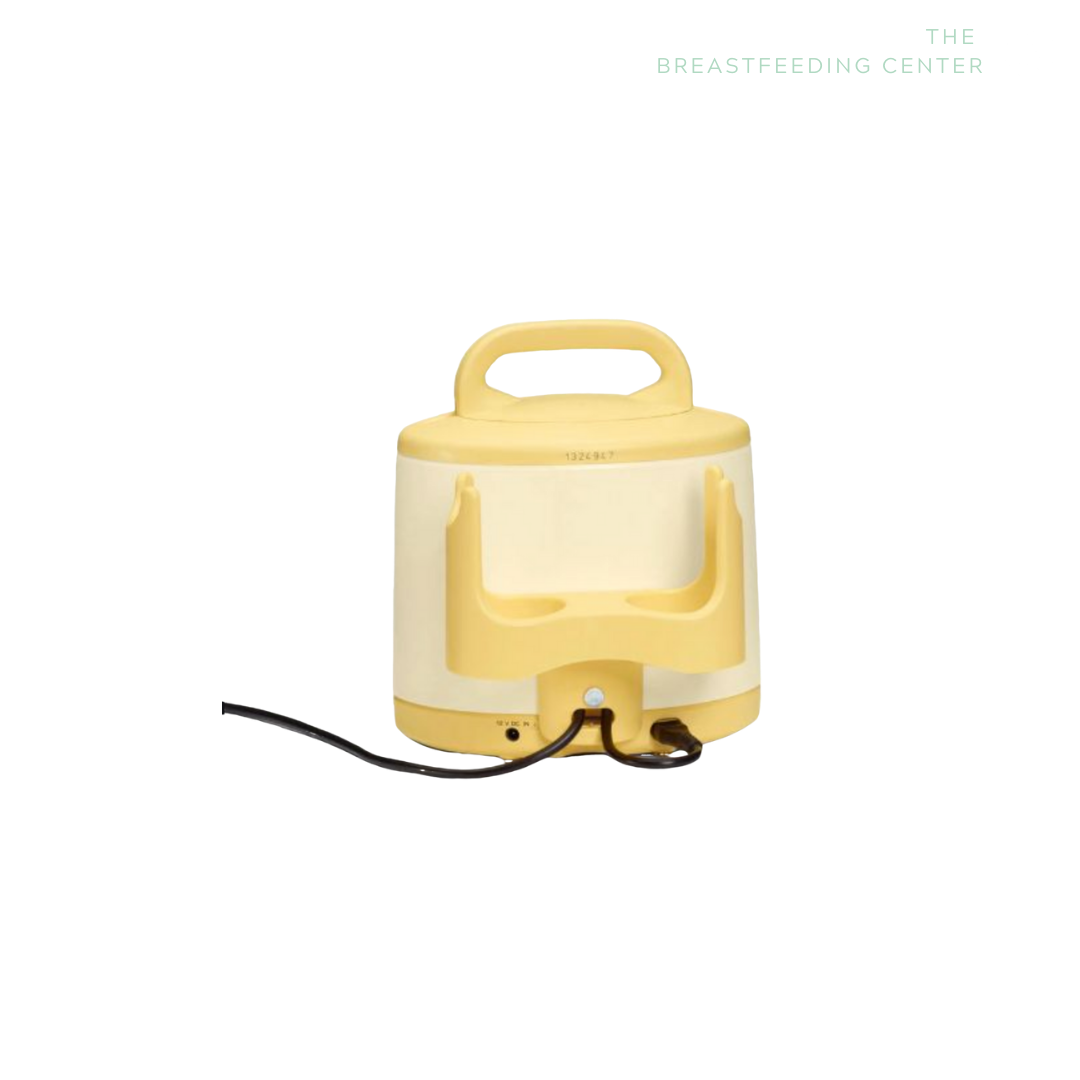
First, Make sure it’s plugged in. Sounds so simple, but along with the part of the cord that plugs into the wall, there is also a sneaky compartment on the back of the pump that connects the pump to power. This compartment is on the back of the pump, bottom right. You will see a sliding ‘door’, when pulled up, there is a place for you to plug in your pump! Now that your pump is plugged into both the wall and the secret compartment, it should automatically turn on
Symphony rentals offered at the Breastfeeding Center typically come with an initiate program and a maintain program. These modes are designed to build and maintain milk production by mimicking the suckling of the baby.
Medela Symphony work in two-phase technology, which means the pump functions to stimulate milk until your “ let down” and then switches over to expression mode.
You use the vacuum control at a comfortable level to stimulate your breast, once you’ve switched over to expression mode you’d adjust the valve once more. Watch the video for further more detailed directions to use the Medela Symphony.
This is a general quick start guide, we recommend reaching out to your consultant for more in-depth questions about creating a pumping routine that might be more ideal for your situation.
If you are in need of an appointment, you can book here or give us a text at 202.293.5182.
Common Troubleshooting Tips
Rentals just like any other machine require upkeep and sometimes factory maintenance. Let’s tackle some quick issues that are pretty common and fixable at home.
#1 WONT POWER ON - If your symphony won’t turn on, please make sure it is plugged in in that sneaky little compartment we talked about earlier
ERROR MESSAGE - This may mean you may need to reboot your pump. If you see an error message, there are two ways that are recommended to reboot your pump.
‘soft’ reboot: first, press down and hold the letdown button. While continuing to hold the letdown button, also press the on/off button and hold. Once the pump reads “please wait” let go of both buttons and allow the pump to finish its reset. If this does not work, try a hard reboot,
‘hard’ reboot: look to the back of your pump. In the center, bottom of the back of the pump, you will find a slit with a card sticking out. This card holds the memory and programming of the pump. Pull this card out, give it a gentle wipe with a wet paper towel and make sure it’s fully dry before re-inserting. Wait a few minutes and then reinsert it. This should reset your pump and allow it to work properly.
DECREASED SUCTION - Welp, you’ve noticed your output has changed or that the suction just seems to be off. Our first suggestion would be to look at your parts! First ensure that all parts, from the caps and membranes, all the way down to the valves and membranes are attached securely and properly. If that looks good, and you are still having difficulty with suctioning, it is recommended that you replace your membranes. These tiny silicone pieces are essential to proper suction. They also easily wear out, depending on the amount of usage. We recommend replacing the membranes every 1-3 months, or if you feel there is a decrease in suction. If you are unsure, reach out to us, we’d be happy to test your pump here at The Center.
Disclaimer: If you’ve tried “hard” and “soft” reboot and neither seems to help, your rental will need to be returned to the location you've rented it, you'd want to suggest that they return it to Medela for service. We, The Breastfeeding Center, screen all of our pumps for error messages or power failures between users and send them back to Medela right away if they've had any error messages. Please note: our location is separate from Medela customer service. If you are renting from us directly, please send us a text at 202.293.5182 and we’ll assist with next steps. If you are renting elsewhere and have continued need for a pump and you'd like to rent with us, here's more information about our rates.